
EnterX Smart Intercom User Manual
Last updated 15 August 2026
rev 1.2
Privacy Policy, Disclaimer and Limitation of Liability
Third-Party Services: This product relies on third-party communication platforms, including but not limited to WhatsApp and local mobile network providers. EnterX does not guarantee the delivery, speed, or uptime of these messaging services. We are not responsible for any delays, message failures, or data costs incurred during use.
Security and Access: Use of this intercom is at the owner’s risk. The owner is solely responsible for verifying the identity of visitors before granting access. EnterX shall not be liable for any unauthorised entry, security breaches, property damage, or personal injury resulting from the use or misuse of this device.
Trademarks: This product is an independent integration and is not affiliated with, sponsored by, or endorsed by WhatsApp LLC or Meta Platforms, Inc. “WhatsApp” is a registered trademark of WhatsApp LLC.
Introduction
EnterX is an innovative intercom that uses WhatsApp messaging to notify any number of residents when there is a visitor at the door. Because it uses WhatsApp, no other app needs to be installed, and it works on Apple and Android devices. The product only needs WiFi with an internet connection and a 12V-DC power source.
Features
- Uses only WhatsApp - no separate app account needed
- Sends a photo of the visitor over WiFi
- Opens the gate from within WhatsApp
- Generates one-time access QR codes for visitors
- Easy-to-use WhatsApp interface with Help via chat
- Request photos of the entrance at any time
- Anti-theft security mechanism (see Owner Registration section)
Physical Installation
Tools Needed
- 2.5mm flat screwdriver
Installation Steps
- Identify a physical location.
- Test the WiFi signal at that location using a mobile app, e.g. Ubiquiti WiFiman. A signal strength above -67 dBm is acceptable.
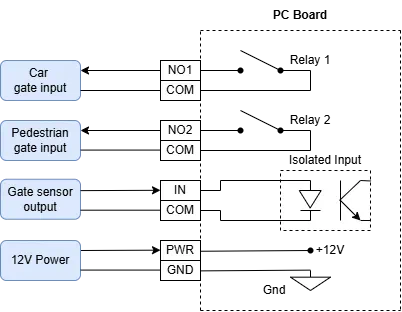
- Connect the power and relay wires according to the wiring diagram. The diagram is viewed from the back of the device.
Installation Guidelines
- Hide the cables running to the device so they cannot be tampered with by a burglar.
- Mount the device at eye level to get the best face picture of visitors.
- Mount against a surface that is waterproof so that water or dust cannot enter from the back.
- Make sure there is a strong enough WiFi signal at the place of installation.
- The EnterX camera has a flashlight that is effective close-up. You may consider installing an external light near the EnterX for clearer photos at night.
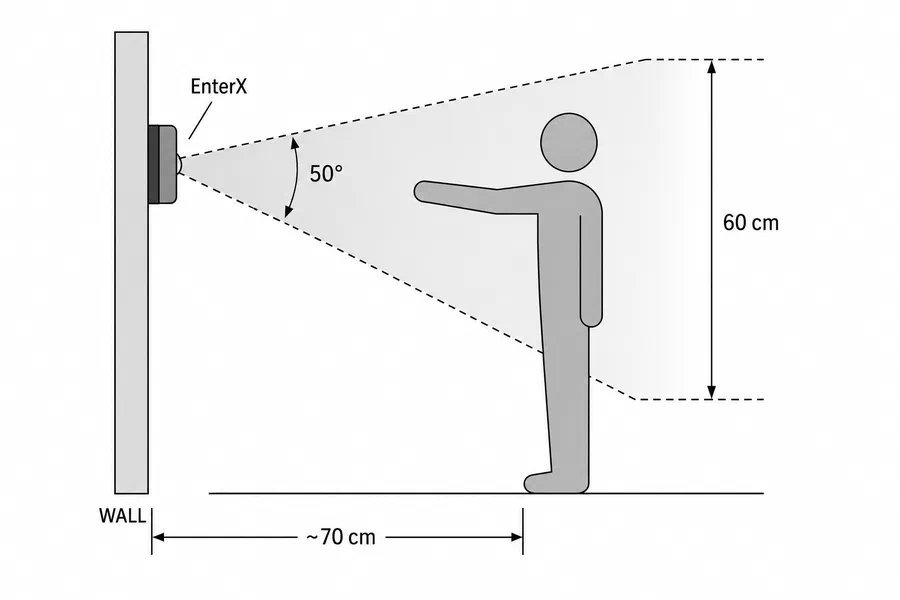
- The LED flashlight has a 50 degree angle, so if a person is an arm’s length from the device (about 70cm) it will illuminate an area of about 60cm - see image below.
Set up the Device
The setup of the EnterX device is quick and easy because it is done from a smartphone’s built-in web browser (e.g. Chrome). Below are the steps to follow for the initial setup:
Store EnterX in Your Contacts
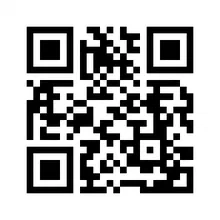
Store the number +18147184199 in your contacts as EnterX, by scanning the QR code below. You will need this during the setup process. Going forward, all your communication with your EnterX device will go through this number. It is recommended to mark it as a favourite in your contacts (usually indicated with a star or heart icon) so that you will hear incoming messages from EnterX when a visitor presses the button, even when your phone is on silent or sleep mode.
Adding EnterX Contact to WhatsApp
From WhatsApp, click the add contact button.
In the next screen, click the QR icon.

In the next screen, scan the QR code above.
Enter Setup Mode
When the device is powered on for the first time, it automatically enters Setup mode. Setup mode is indicated by one or more LEDs blinking at medium speed - 1 pulse per second. As the user progresses through the setup stages, different combinations of LEDs will blink to indicate the different stages. See the Setup Mode table for more information. You can re-enter setup later by following the factory reset procedure described in this manual.
Connecting to the EnterX Device with WiFi
With a smartphone or computer, search for the WiFi access point (AP) enterx-setup and connect to it with the factory password version1.
Open the browser on the smartphone and type the following into the address bar: 192.168.6.1
Welcome Page
The first webpage shows a welcome message, as well as terms and conditions for using the service. The user must click ACCEPT to move to the next page.
Internet Connection
This page lets the user set up the WiFi details for the EnterX device and test the connection to the EnterX server. Follow the instructions on the page. You will only be able to proceed to the next page once a good connection to the EnterX server has been confirmed.
Owner Registration
On this page, the user registers themselves as the owner of the EnterX device. The new owner will be required to send a WhatsApp message to a specific number from their WhatsApp account, so keep a smartphone with the owner’s WhatsApp account ready.
Additional Information
On this page, the system asks for additional information, such as a short name for the device. You will use this name in some WhatsApp commands, so keep it short and easy to remember and type on a phone’s keyboard, e.g. “house” or “flat”.
Finish Setup
This page notifies you that the setup is complete. After clicking the FINISH button, the device’s hotspot will be disabled, and it will function normally. You can re-enter the setup by following the factory reset procedure.
Factory Reset
To factory reset the device:
- Power the device off.
- Press and hold the QR button.
- While holding the QR button, power the device back on.
- Hold the button in until all 4 LEDs flash fast.
- Then release the button.
- The device is now in setup mode - refer to the Setup section and Setup Mode table.
💡 Even after a factory reset, the owner remains unchanged and is the only person who can transfer ownership to a new owner or add/delete residents for the particular device. This is an anti-theft measure and makes the EnterX unusable and worthless for anyone other than the owner.
Normal Operation
HOME Button
A visitor to the gate has only one of two actions to do on the device:
- Press the HOME button to send a WhatsApp message with a picture of the visitor to all residents. If the first response from any of them is to press the OPEN button in the WhatsApp message, the gate will open. Similarly, if the first response from any of them is pressing the DENY button, the gate will not open - regardless of subsequent responses.
- If the visitor received a QR code via WhatsApp, they can press the QR Scan button while presenting the QR code in their photo to the camera of the EnterX device. A valid QR code will open the gate and send a notification to the residents, notifying them of the visitor.
WhatsApp Interface
Once the device has been set up and has an internet connection, all other interactions happen via WhatsApp.
Owner versus Residents
During the initial device setup, the owner of the device was specified by sending a WhatsApp message from their number. The EnterX system allows for only one owner but multiple residents. Only the owner and the registered users can interact with the device via WhatsApp. A command originating from any WhatsApp number other than the owner or registered users will be ignored.
WhatsApp Commands
Users interact with the device by sending commands via WhatsApp. Some examples of useful WhatsApp commands are “QR” to get a temporary access code for a visitor and “photo” to get an up-to-date photo of the entrance. To see all the available WhatsApp commands, you can send the message “help” to EnterX’s WhatsApp number, which was stored during the Owner Registration step of the Setup process.
Case Sensitivity
All WhatsApp commands are case-insensitive. <DeviceName> is the short name assigned to a device during initial setup. It is only required if more than one EnterX device is linked to a user. Examples of device names are “house”, “flat”, “door”, etc. It is a short name to identify the device in the case of the user having multiple devices.
Subscription
EnterX billing is pay-as-you-use, via InstantEFT - no credit cards and no subscription required. The types of users provided for on the EnterX system are set out below. After a device is registered to an owner, the owner has a period of free usage during which they will receive WhatsApp communication with instructions on the billing process. Note: In this document, the term Unit is used to refer to a unit of residence, either single, in a residential complex or block of flats. E.g. unit 31 refers to house number 31 or flat number 31.
| User Type | Description | Cost |
|---|---|---|
| Admin | Does not get notifications of visitors and cannot generate visitor access codes, but has full permissions to add/remove users on the device and transfer the device to another person. For a Home model, this is typically the primary resident of the house. For the Complex model, this is typically someone in the body corporate or admin office. A device can only have 1 Admin user. | Free |
| Owner | The primary resident of the property (unit). Gets visitor notifications like normal residents, but can also add/remove other residents and guards. For a Home model, the Owner is typically also the admin. For a Complex model, there is an Owner for each Unit of residence in the complex. The Owner is responsible for the billing of all Resident users in that Unit, including themselves. | see Pricing |
| Resident | Gets notifications of visitors and can generate visitor codes. Can send commands at any time to open the gate or request a photo. Cannot add/remove other Resident users. | see Pricing |
| Guard | Can only send commands to open the gate or request a photo, and is limited to a limited number of commands per month. The guard user is typically assigned to an armed response company but can also be a neighbour, allowing them to open the gate via WhatsApp in emergencies. All Resident users of the Unit will get a WhatsApp message when the guard opens the gate. | Free for one Guard user per Unit of residence |
LED Indicators
There are 4 LED light indicators on the device. Each indicates a different state during normal operation, and they work together to indicate states during BOOT or SETUP processes. The tables below list the different states indicated by the LEDs.
Normal Operation
In this state, the LEDs are SOLID on, not blinking, and only one is on at a time. They indicate the following states of the device:
- READY (blue): device is connected to the internet and ready to be used by a visitor
- BUSY (orange): the HOME button was pressed, and the device is waiting for a response from the owner. Or the QR button was pressed, and the device is using the camera to scan for a QR code.
- DENY (red): the owner/resident denied the visitor access, or an invalid QR code was identified by the camera.
- ACCEPT (green): the owner/resident granted the visitor access, or a valid QR code was identified by the camera.
Boot Mode
After power-on, until the device is fully operational and connected to the internet, a combination of LEDs will blink FAST (3 pulses per second) to indicate the state of the boot sequence. This is useful in cases where the device never becomes READY, to identify where in the boot sequence the problem is.
| Ready | Busy | Deny | Accept | Boot Stage |
|---|---|---|---|---|
| ● | Initialise the MCU peripherals and GPIO | |||
| ● | Initialise the Camera & NFC | |||
| ● | ● | Connecting to WiFi access point | ||
| ● | Waiting for Time Sync to complete | |||
| ● | ● | Connecting to the MQTT server | ||
| ● | ● | Bootup done |
Setup Mode
During initial setup or after a factory reset, the device enters SETUP mode. In this mode, the LEDs will blink at a MEDIUM speed (1 pulse per second).
| Ready | Busy | Deny | Accept | Setup Stage |
|---|---|---|---|---|
| ● | Starting WiFi hotspot | |||
| ● | Starting web server | |||
| ● | ● | Page 2: Waiting for WiFi credentials | ||
| ● | Page 2: Connecting to WiFi | |||
| ● | ● | Page 2: Waiting for the WiFi connection to complete | ||
| ● | ● | Page 2: Connecting to MQTT server | ||
| ● | ● | ● | Page 2: Waiting for server confirmation | |
| ● | Page 3: Checking admin registration status | |||
| ● | ● | WhatsApp: Waiting for Terms & Conditions | ||
| ● | ● | WhatsApp: Waiting for your first name | ||
| ● | ● | ● | WhatsApp: Waiting for your last name | |
| ● | ● | WhatsApp: Waiting for the device name | ||
| ● | ● | ● | WhatsApp: Waiting for the device address | |
| ● | ● | ● | WhatsApp: Waiting for the location URL | |
| ● | ● | ● | ● | WhatsApp: Waiting for the final “done” message |
| Setup done: stopping hotspot, switching to normal operation |
Error Mode
If a non-recoverable error occurs during normal operation, the device will enter an error state, and the LEDs will show LONG slow pulses (1 pulse every 3 seconds) to indicate the exact error.
| Ready | Busy | Deny | Accept | Error Description |
|---|---|---|---|---|
| ● | FSM state machine error | |||
| ● | Non-volatile storage error | |||
| ● | ● | LED driver error | ||
| ● | OTA firmware update error | |||
| ● | ● | Camera error | ||
| ● | ● | NFC error | ||
| ● | ● | ● | WiFi error | |
| ● | MQTT connection error | |||
| ● | ● | Web server error | ||
| ● | ● | ● | ● | Device bricked |
Fault-finding
Normally, EnterX starts up and connects to the internet in less than 30 seconds. If something goes wrong with the device, either during bootup or normal operation, the LEDs will be a good indication of the cause. If the LEDs blink fast, it gets stuck in the bootup sequence, and if they are slow blinking, a hardware or other error is present. In such cases, take a photo or short video of the LEDs and send it to the contact details below.
WiFi Connection Problems
If, during bootup, the device progresses to at least the “Connecting to WiFi AP” state but never to the “Ready” state, check the following. These points are described in more detail on the EnterX website.
Basic Checks
- The device is within good WiFi range of the router. Use an app to measure the WiFi strength.
- The network is 2.4 GHz, not 5 GHz only.
- The network has a working internet connection - open a website on a phone connected to the same WiFi to confirm.
- The WiFi name (SSID) and password were entered exactly, including correct upper/lowercase letters.
- The WiFi password has not recently been changed. If it has, re-run the setup to enter the new password.
Advanced Checks
- The network does not show a sign-in or “accept terms” web page when you first connect a phone to it (a “captive portal”). EnterX cannot complete those pages.
- The router is not full - some routers limit how many devices can connect at once.
- Parental controls, firewalls, or “approved devices only” settings are not blocking new devices.
- If you use a VPN, ad-blocker, or custom DNS on your router, try temporarily disabling it during setup.
Quick Things to Try
- Download our EnterxConnectivityCheck Python script from the EnterX website and run it on a computer connected to the same WiFi network. It will check for any blocked ports. Networks at businesses, estates, or complexes with managed/IT-controlled WiFi sometimes block the device for security reasons - they must unblock it.
- Restart the router, wait two minutes, then power the EnterX device off and on again.
- Re-run the EnterX setup wizard from the start and re-enter the WiFi details.
- If you have a second network available (for example, a phone hotspot set to 2.4 GHz), try connecting the device to that.
Still Stuck
- Note down which network you are using and the colour/pattern of the device’s indicator lights.
- Then contact Support.
Contact Details
Website: enterx.co.za Email: info@enterx.co.za Telephone: +27 87 230 0134 Notifications WhatsApp Number (not for enquiries or support): +1 (814) 718-4199
Technical Specifications
| Dimensions | 115 x 75 x 29 mm (height x width x depth) |
| Weight | 109 g |
| IP Rating | The device is fully water and dust-proof if mounted correctly against a waterproof support, e.g. a wall, in an upright position. |
| Operating Temperature | 0 ~ 50 degrees Celsius |
| Power Supply | 10 ~ 15 VDC @ 0.2 A (max 2.4 W). This is only for the operation of the device itself and excludes the loads being switched by the relays, e.g. a door solenoid. |
| Surge Protection | 400W transient voltage suppression on power and relay lines. |
| Outputs | Normally open relay, 60V max switching voltage, 1A max switching current. The switch period is configurable. |
| Inputs (only on some models) | 3.3V ~ 30VDC. Draws 3 ~ 19mA current, depending on the voltage. |
| Internet connectivity | 2.4GHz WiFi, IEEE 802.11 b/g/n compliant |
| Camera | Photos are limited to 800x600 pixels |
| Flash | 8930 mcd, 55 degree view angle |